

Housekeeping: RSS is Improved
Sat 22 June 2024
Michael Labbe
#meta
Just a quick note to say I improved Pelican’s RSS generator for Labs. You can now read full articles in your RSS reader if you subscribe to this blog. Previously they were truncated, which forced users to go to the site. Now you can read the posts anywhere you want.
I also cropped the number of posts in RSS down to five so RSS readers will not need to mark a ton of really old posts as read. There has never been a better time to subscribe. :)
Design For Rigorous Configuration
Sun 09 June 2024
Michael Labbe
#code
Modern web applications are a façade consisting of many smaller programs and libraries that are configured to run in concert to produce a result. To developers outside of games, this has been acutely obvious for a long time. Games have largely been spared the configuration needs this brings due to a focus on producing a monolithic runtime. However, many modern games ship proprietary logic outside of the code that runs on the disc, such as backend services, so has been affecting games for some time, as well.
At the heart of all this is the need for configuration. Having personally experienced professional devops roles, there seems to be a lack of deep thinking about configuration. This article hopes to inspire deeper thinking about configuration design for programs.
Application configuration is our opportunity to affect runtime state before a program begins its main execution. Static declarations are easily definable, immutable, loggable, can be stored in revision control and can be easily reviewed by a team. Runtime state, on the other hand, is ephemeral and mutable. Through configuration, we have the opportunity wield the runtime state of large, distributed applications in predictable, effcient ways. Most programs do not seize this opportunity.
We treat configuration like it is simple and easy. It is time to start respecting configuration in application design and maintenance.
Ground Truth Configuration
What is the ground truth configuration for a program? Is it the config file? Not even remotely close. It is the portion of in-memory state that is necessary to cause an (approximately) deterministic, repeatable execution of the program. This is what I call the “ground truth” of an application’s configuration. It usually includes:
- command line parameters
- parsed config files
- program version and build arguments used to produce the program
- environment variables
- dll libraries and their build arguments
- in Unreal or other game engines: the state of runtime console variables
Commonly, programs read configuration from many sources. A bespoke search path for configuration, starting from system-wide, and moving in to home directories. Environment variables as an override. Then, command line arguments.
This process differs for each program which is why you’ll see each program document it. Even specifying the system hostname requires addressing multiple files, deprecations and symlinks on Linux.
What happens if there is a system-wide config file but it is not readable because of the permissions of the current user? Pass over it? Throw an error because it exists? This, too, is ambiguous and varies from program to program.
The bottom line is that most programs accumulate a ground truth configuration haphazardly, and then begin executing, perhaps destructively, with no means to review the configuration before it starts.
Config Files Permit Underspecification
Writing code is commonly less time consuming than maintaining and debugging the same code. The same is true of configuring software versus troubleshooting it. A misconfigured application produces errors for end users. Many of the configuration formats that are commonly in use (JSON, YAML, TOML) prioritize convenient authorship over unambiguous runtime states. This allows for rapid configuration in exchange for potential risks involving:
- implicit defaults
- specification of keys that do nothing (sometimes due to a trivial indent error)
Implicit defaults are exceptionally bad when ground truth configuration is not reviewable. You may not even know that you are operating on a bad default, or that an option exists.
Consider:
secrue=trueAn insufficiently rigorous program can be misconfigured to breach security without error due to these two aforementioned properties.
YAML, in particular, has a lot of known pitfalls. The point of this article is not to debate popular config file formats. A good developer can overcome YAML’s problems with knowledge and practice, but the problem of contending with underspecified ground truth configuration state is a lifelong drag which can only be overcome through good program design.
Config Parsers Have No Specification
JSON, YAML and TOML all have versioned file format specs, but those specifications have no details about how they should affect on-disk performance. Some examples of ambiguities:
- How is invalid parsing handled?
- What is the config search path precedence? eg: Are ‘.yaml’ and ‘.yml’ both valid extensions?
- If a sub-table exists in two files that are both read in, how should they be merged?
- How to handle a value being an unanticipated type? eg: will an integer be converted into a string or result in an error?
- Where do implicit defaults come from, and how do I review what they are?
- How should we handle parsing older or newer versions, where the config options have changed?
- If config files are parsed in order to initialize logging, how do you log errors in the config file?
Every program behaves differently as a result of this underspecification.
Mental Model of Program State
When folks debug a program, they have a mental model of its execution in their heads. Consider:
b = 1; if (cfg.a) b += do_optional_thing() // code continues to do complex things with b When a developer reads this code, they will either consider b to be augmented by config option a or not. Their mental model of the code necessarily includes this mutating state. Therefore, in removing as much uncertainty as to what the state of a is, is important to someone attempting to ascertain why they are seeing the result of b on their screen.
The rest of this article’s solutions emphasize the need for reducing the size of the mental model necessary for proper configuration troubleshooting.
Imperative vs Declarative - A False Dichotomy
Which one is right for your application depends on your context. Declarative configuration is a turing-complete program that configures a program. Keeping a mental model of config state requires mentally interpolating variables, simulating loops in your head and jumping through nested function calls.
Imperative configuration lays it all out flat, which lets you see what things are. However, almost everything imperative ends up becoming awkwardly complex when it layers in declarative concepts. See: HCL for_each loops or Ansible adding Python dictionary lookups to YAML files.
A better approach is to think of imperative configuration as a funnel. A data table, perhaps nested, of configuration values can be derived from all sources and fed as input to the ground truth configuration. This table could be declared, or imperatively derived.
The healthy thing is to arrive at a data table of explicit program configuration before core execution of the program starts — an imperative funnel which can be arrived at declaratively.
What We Really Want When We Wish for a Schema
Schemas are for constraining config file formats, not for constraining ground truth configuration. Ground truth configuration is subjected to underspecified parsers, config file search orders, environment variable and command line overrides and more. Therefore, a schema for a config file does not solve the larger program configuration problem by itself. It doesn’t necessarily hurt it, either, though.
When someone says “we need schemas”, it is useful to explore the root reasoning of that statement before jumping in.
In structured languages, a ground truth configuration can be typed and could be used to produce a schema. The right choice is to keep as much ground truth about the program’s configuration in one reviewable structure.
Most importantly, provide the best tooling for your in-context situation to edit and review the program’s ground truth.
Configuration Becomes Fragmented When Generalized
Configuration has a way of becoming layered, especially in devops. For example:
- A Dockerfile contains a minimal OS configuration
- Another Dockerfile derives from that, containing a program’s installation
- A Helm Chart references the Dockerfile, setting environment variables
- A
values.yamlfile overrides the Helm Chart for a forked Docker image - A Kubernetes deployment further specifies environment variables to override in-Dockerfile configuration files
In this case, we reap the benefits of a highly-available program that is configured to our specification, compiled by a program provider else and made to work for our purposes. This reduces a large one-time up-front cost. However, we incur a cost of five configuration files, implicitly depending on values from each other to derive whole program state. This has a drag on efficiency for the lifetime of the product. This is an important tradeoff in where you spend effort — one to commit to consciously.
Configuration in the Large
Each small program comes with its own configuration files and state. Since your application consists of multiple programs, you end up producing configuration files that require values that are similar between them. This is brittle when changed.
Further, if there are multiple versions of an application (eg: test and production), there is an n by m problem, where each dependent configuration must exist for each version of the application.
This can be addressed by having a single source of truth for each application configuration, used to produce the smaller configurations for each program.
Rigorous Configuration Files
For the remainder of my life I will depend on large applications that are made up of many small, configured programs operating in concert. Making configuration correct, safe and expressive is an opportunity to wield large numbers of these programs with minimal cost and overhead.
Many of these smaller programs came from programming cultures that emphasized getting something up and running over long term maintainability, loose coupling and quick-and-dirty scripting. As computing complexity increases, it is my hope that the sort of rigorous values that spurred the creation of languages like Rust are applied to configuration management.
Constant Time Memory Allocation From Object Pools
Sat 27 May 2023
Michael Labbe
#code
Having linear pools of homogenous objects is good for performance, but eventually a piece of code will need to operate on or reserve a single object from the pool. This is a practical reality in gameplay code where things exist for a short time and interact in one-off situations.
What does freeing and allocating a single object from a preallocated pool mean? Let’s clearly establish the scenario:
- The entire pool is heap allocated at startup, and commonly initialized to nil values. The entire pool lives at a fixed size for the session.
- Allocating an object from the pool means receiving a handle to the object. The handle is valid until free is called, at which point the object in the pool can be reallocated in the future. This effectively reuses the object memory without returning it to the system.
- Once all of the objects in the pool have been allocated, further allocation fails. The pool is contiguous in memory and its handles do not invalidate because of a memory relocation on realloc.
It is clear to see that allocating and freeing objects from a pool needs to be quick. It happens hundreds if not thousands of times per frame. Linearly searching the list for a free pool entry is not going to yield acceptable performance.
Further, a non-intrusive solution is needed, as the entire array is commonly iterated over during processing to avoid branching and data about freed objects cannot reliably be stored in-array.
The rest of this article explains a constant-time approach to allocating and freeing from the pool.
The Swap Delete Technique
The Swap Delete technique was first introduced to me in a GDC Canada 2010 talk titled A Dynamic Component Architecture for High Performance Gameplay. It is a talk by Insomniac’s Lead Systems Engineer, Terence Cohen. Outlined in just a few slides in a much larger talk about dynamic component systems, Swap Delete is a brilliant technique that deserves to be plucked out of his larger talk and explained in depth. Note that this technique can be used with any homogenous object pooling system, with or without a component system sitting atop.
First, let’s establish the terminology we need:
-
Object Pool: An array of homogenous objects.
- Handle: an array index into an object pool. Where
nis a handle,pool[n]returns thenth object from the object pool. For the purpose of this article, there is no difference between a handle and an index into an array of objects.
- Handle: an array index into an object pool. Where
-
Roster Table: A table of handles. No handle is repeated, and every handle from the pool is always in the roster table. Handles are unique indexes into the object pool.
- Roster Index: An index that looks up a handle stored in the roster table.
- Partition: A roster index that points at the roster table’s first free handle.
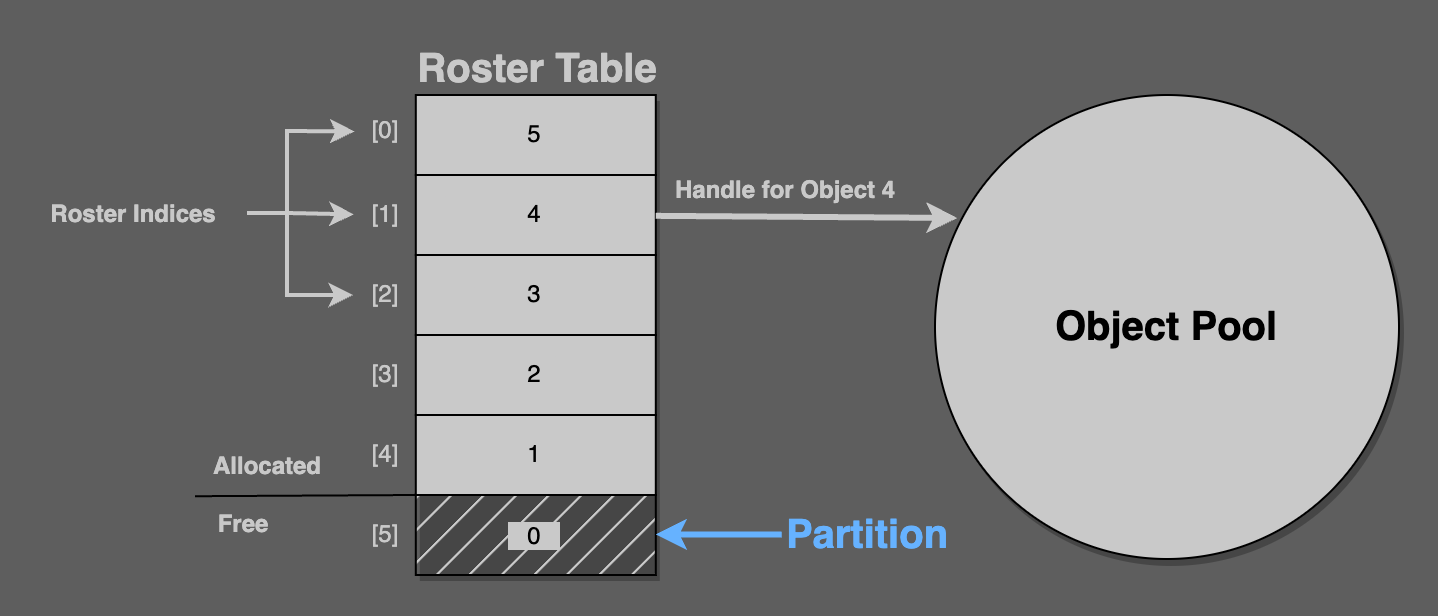
Consider this figure: The roster table‘s six values are handles, from 5 to 0. Here, roster[1] returns the handle 4, which is the fourth object in the pool.
Here, partition == 5, which points to the roster table field containing the value 0. Zero is the handle of an unallocated object from the pool.
The partition always points at the next object to allocate. It always separates the handles in the roster table from the allocated ones.
Constant-Time Allocation
On allocation a handle for the pool object at the partition’s address is returned. The partition is then incremented by 1.
// alloc pseudocodeassert(partition < pool.length)new_handle = roster_table[partition]new_obj = pool[new_handle]partition++That takes care of constant time allocation, but what about deletion? Clearly, the partition needs to always point at the next free object in the roster table for this allocation scheme to work.
Constant-Time Deletion
To delete a handle, swap its roster table entry for the entry just before the partition.
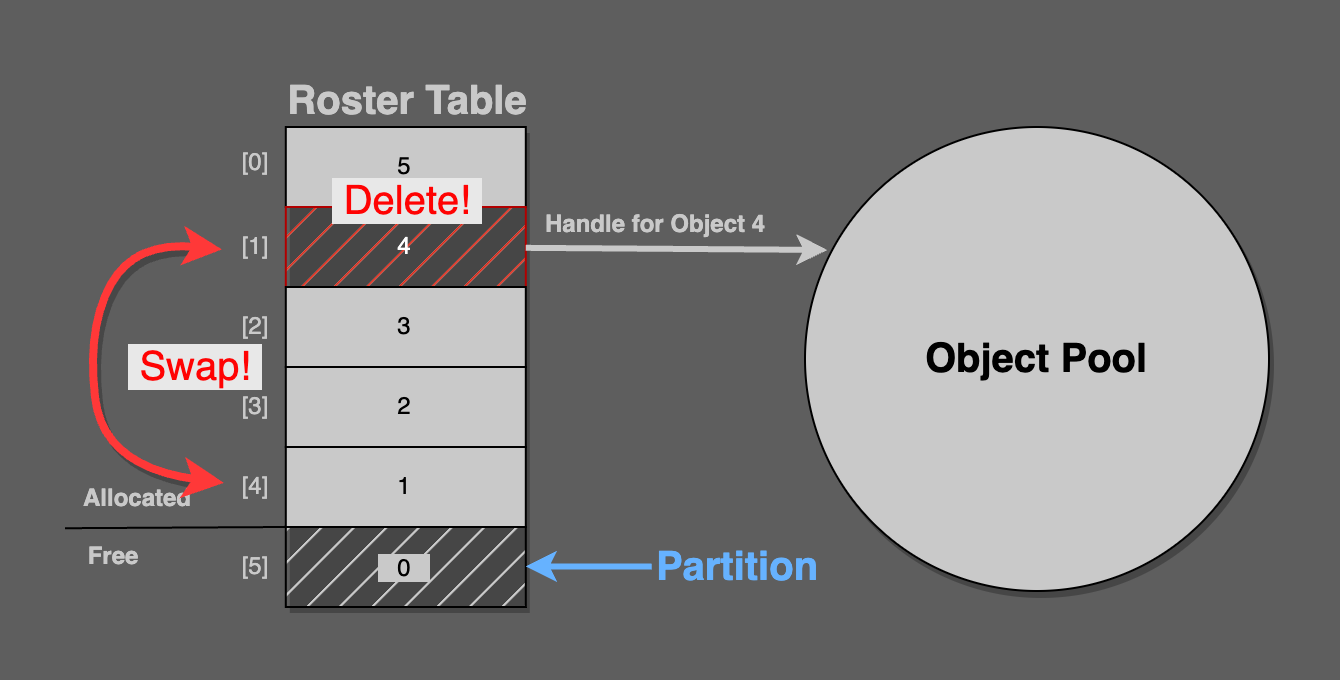
In this figure, pool handle 4 from roster index [1] is being deleted. It is swapped into roster index [4], because the partition is pointing at [5].
Now, simply decrement the partition, so that it points at the newly freed roster index entry.
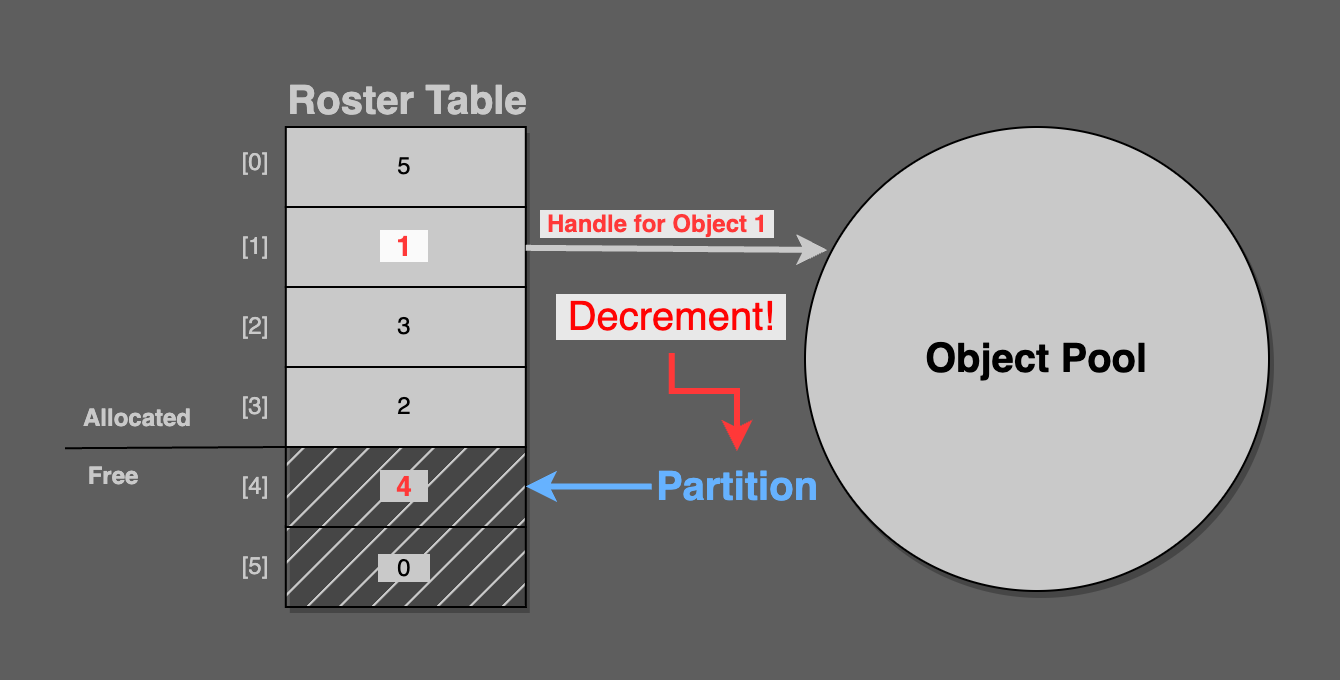
As you can see in the final figure, the partition points at [4], which contains pool handle 4. This is the freshly deleted pool object.
Consider that the next call to alloc will correctly return pool handle 4.
// free pseudocode roster_index_for_deletion = handle_to_roster_index(handle) swap(roster_table[roster_index_for_deletion], roster_table[partition - 1]) partition--Implementation Details
There is a necessary implementation detail that is not mentioned in Terrence Cohen’s presentation and is also not pictured in the graphics in this article.
All calling code will pass objects in by handle, not roster index. The roster table is an implementation detail of the pool.
When an object is freed, it will be passed in by handle, but the roster index is needed to perform the swap. In order to resolve a handle into a roster index, a lookup table from handle to roster index must be created. Its fields must be swapped whenever the roster table’s values are swapped. It is a reverse lookup that must be kept in sync any time the roster table is updated.
That’s it. In total, there are three arrays that must be maintained:
- The object pool
- A roster table, containing handles into the pool of objects
- A handle-to-roster table, mapping handles to roster indexes
The roster and handle-to-roster tables are implementation details of the pool’s allocation and free functionality; the caller never interacts with them directly. The caller solely deals with handles.
A Better Handle
It is possible that a stale handle could point to an object that used to exist but has been freed and re-allocated. This is possible because handles are reused between alloc/free events.
If heap allocated objects were used instead of a pool, stale pointers would likely crash, which is arguably preferable to stale data making its way into a running program which would subtly display strange behaviour.
Andre Weissflog wrote a thought-provoking article on using handles instead of pointers. In an update at the end of his blog post, he proposes adding a generational counter to handles. An object pooling system based on handles would do well to consider generational checks when mapping a handle into a pool, especially while debugging.