

Grain and Value Specialization
Thu 30 April 2026
Michael Labbe
#grain code
A designer who worked on a AAA open-world game once remarked that he spent weeks implementing a sweeping behaviour change across every traffic light in the world. A design change made it necessary to re-code every traffic intersection in the game to support right-on-red traffic.
When he proposed that the next game be built with common traffic light logic that applied to all lights, the counterargument was: “if it breaks in one place, it’ll break everywhere”. His response: “If it breaks everywhere, we’ll know exactly where to go to fix it.”
Practising developers find that the truth lies somewhere in between, and it depends on your project. Your tools must empower you to be productive wherever on that spectrum you find yourself.
Grain DDL 0.2.0 (pre-alpha test) now offers a technique called value specialization. This allows you to declare a type that has the exact same fields, in the same order as a base struct, but with the ability to explicitly override the values. No new values can be added.
struct A { i32 a = 10, i32 b = 20}struct B copies A { // a is copied from A.a i32 b = 30}This produces the following values:
A.a = 10A.b = 20B.a = 10B.b = 30 This is “value specialization for PODs” — a flat memory model where only plain old data is subject to being overridden.
Grain DDL is designed to let you generate anything you want from its source data and types. But it keeps you in check about what you can define to keep you generating simple, effective code. In order to use value specialization to its maximum advantage, only the values can change, and not the types. Consider:
struct C copies A { // error: A.c does not exist and new fields not possible i32 c = 10, // error: A.b exists, but it is i32, not f32 f32 b = 10,}In the case of C.b, you might be asking “why are you asking the user to restate the type in the derived struct, if it has to match? “
When creating just a few instances by copies, this will seem like an unnecessary burden. However, once you have quite a few, a sense of base type calcification naturally occurs: if I change the type of this field in the base, how many downstream things could break?
Grain DDL has implicit casting of expressions resulting in scalar values — albeit with full checks for overflow and underflow at compile time. However, in the event that a type changes in a copied struct, it becomes important to comb over the code and ensure that all of the values are also correctly and adequately typed. This requires a touchpoint from a developer. No silent truncation is possible.
The compiler catches the type mismatch until you visit the line. By changing the type, you are signing off that the declared value is compatible with the type change.
Late-Stage Binding
One of the timeless functions of spreadsheets is relative referencing. If you have a formula like =A1+B1 and drag the selection box downwards, the next field will be =A2+B2. This is used to great effect in calculating the same formula for a different set of values.
Grain DDL uses late-stage binding. When you have a base struct with a formula that has field names in it and it is derived via copies, the formula is calculated in the context of the values in the derived struct.
Consider how sum behaves on override of b:
struct A { i32 a = 10, i32 b = 20, i32 sum = a + b}struct B copies A { i32 b = 30, // instead of 20 // sum calculated here with 'b' overridden to 30}This produces the following values:
A.a = 10A.b = 20A.sum = 30 <- sum of A.a + A.bB.a = 10B.b = 30B.sum = 40 <- sum of B.a + B.bThis is a powerful feature that permits you to model relationships between values in one place, and have that cascade. It is designed to run as a precompile step, so the result of your computation is simply placed in your code and values are easily reviewable.
Said another way, the values are computed at emit time, and can be reviewed as plain numbers.
Putting it Together With Codegen Templates
Grain DDL lets you generate anything you need by specifying a .cgtmpl file at compile time.
When iterating over structs, .copy_name gets the name of the struct:
[_ range .structs if .copy_name .name ` copies ` .copy_name ``. else .name ` does not copy`. endend_]Produces
A does not copyB copies ALive Sample Code
See example “Copies Keyword” in the Grain IDE for a demonstration of how weapons in a game use value specialization to create one type, calculate DPS from a set of factors, and produce simple C definitions that reduce the complexity of a game runtime.
On Traffic Lights and Best Practices
I believe my colleague’s desire to have all of the traffic lights in an AAA open world operate from the same common logic was directionally correct. However, if you are building a hundred intersections in an open world, I would recommend using a system like Grain DDL’s value specialization to define them, keeping in mind:
-
Code-Generate a single base structure — all traffic lights are one fat struct, where the difference is in the values rather than through tagged discrimination.
-
Use Grain DDL’s late-stage bindings to formulate values and then generate compile-time asserts to ensure they remain in acceptable ranges to catch problems at compile time rather than QA time.
-
Consider that some traffic intersections may be so different they should be special-case coded and not part of the system.
-
Use Grain DDL’s type checking system to make incremental, verified structural alterations as needed.
Help Develop Grain
Grain is currently in closed pre-alpha testing. If you would like to try it or share feedback, email grain _at_ frogtoss dot com.
You Can’t Promote a Programming Language By Its Features Alone
Wed 07 January 2026
Michael Labbe
#marketing
It is deceptively easy to make the mistake of attributing a language’s popularity solely to the syntax and functional features of the language. In reviewing why languages became successful, there is often a retroactive feature-driven mythology wherein we over-attribute the success of a language to its unique syntax and functionality. Simultaneously, we under-attribute the environment the language was in at the time of its early maturity to its eventual uptake.
Ultimately, no programming language has become highly adopted on function and syntax alone, and so it does not make sense to retroactively attribute its success solely to function and syntax. Its ascent must be contextualized with the era of its uptake to be well understood.
The adoption of a language toolchain takes significant effort for a team or an org to achieve, and some threshold must be crossed to make the integration last. While language features can lower this threshold, it is the environment in which the language flourishes that justifies the overcoming of the threshold in the first place. This forward momentum — the why — is essential for adoption.
In practice, the most popular languages we use are the result of the intersection of trends in computing with the function of the language. It is informative to look at the environment in which each of these languages flourished.
-
C C was the best language for hardware-agnostic Unix programming at the time when Unix was taking off. Low-overhead Unix syscall compatibility and direct memory access were a fit for the everything-is-a-file Unix trend, whereas Pascal was weaker in these crucial areas.
-
C++ By the 1990s, programs were increasingly created by larger teams. C++ offered syntactic boundaries that allowed programs to map to team structure. Additionally, the 1990s were a golden age for selling compilers in boxes at retail, enabling unparalleled awareness of the language. GUIs became commonplace, and the OOP additions to C++ were perceived as useful for composing graphical interfaces.
-
Perl CGI needed something more practical for extraction and reporting than Bash. JavaScript was effectively unreliable in web browsers of the era, so sophisticated full-page server-side rendering was the order of the day. Late ‘90s cheap shared hosting democratized server access. The availability of MySQL and Postgres clinched the deal, and the LAMP stack was born.
-
Python 2 By the 2000s, scripts were increasingly created by larger teams. Python 2 offered syntactic constructs that made it easy to compose long-running scripts in a more readable and maintainable way than Perl.
-
Python 3 PyData/ML stack became institutional. As data science and ML hiring surged in the 2010s, Python 3 became the default research-to-production path. Many new developers may even think of NumPy/SciPy as being intrinsic to the toolchain.
-
Ruby (on Rails) Developers needed to iterate quickly in the problem space of web service business. This happened at a time when VCs infused cash into a cultural movement that emphasized iterating quickly to find product-market fit.
-
JavaScript The web browser is the open, universal runtime we got, and JavaScript had a twenty-year head start on any real alternative. (Sorry, Java Applets).
-
Java The onboarding of businesses to the Internet happened at a time when a memory-safe language was needed for network-aware programming by large numbers of programmers. The influx of many freshly graduated compsci majors who found direct memory manipulation challenging could be put to work to deliver real corporate value on large teams. Java’s timing was serendipitous for the enterprise build-out.
-
C# Microsoft, at a time when they were the most dominant software vendor in the world, massively backed developers during “dot com” layoffs and early 2000s corporate downsizing. They emphatically showed the Windows platform-supported way of doing memory-safe programming. Using COM or Java to build Windows was now off-book. Out-of-work developers took them seriously and reskilled with C#. Unity later bet the farm on C# which was a second shot in the arm for the language.
-
Rust Modern networked devices have to deal with increasingly diverse untrusted data processing (such as bluetooth packets, fonts, audio streaming). Major industry players such as Microsoft, Google and AWS have sought to reduce memory-safety-related CVEs in “zero-click” attack surfaces without the use of garbage collection.
A lesson we can take from this is that you can’t market a language a position of popularity by simply espousing its features and qualities in public. You can, however, build a language and the foundations of its toolchain and help it hitch onto a greater trend. Changing needs are what prompt teams to overcome the friction involved in upgrading their software development tooling.
As always, timing is key.
Printable Base89 LUT Encoding
Mon 20 October 2025
Michael Labbe
#code
Need
In state logic or semantic markup with text strings, there are two options: in-band formatting, or out of band formatting.
In-band formatting indicates changes in a string. For instance:
Hello <span name="first_name">Fred</span>Out-of-band markup involves describing a range of characters as having properties as part of a separate data structure.
const char *text = "Hello Fred";Span spans[] = { {6, 10, "first_name"} // chars 6-9 form "Fred"};Out-of-band markup is ultimately more efficient, but in-band markup has the advantage of being incredibly handy to author in an ad-hoc way, such as when putting together a string literal in a program.
Unfortunately, all of the in-band markup languages are intended for a specific output environment, such as ANSI escape sequences or HTML, and the definitions of them are large, but also limited to the intended use of the defining parties.
Printable Base89 LUT Encoding addresses this. You embed indices into a lookup table in your string. What is in the lookup table is up to you, the developer.
The following spec only describes how to embed the lookup table indices in a string, not what you could do with it. In practice it is useful for a few things:
-
Semantic markup for theming
-
Styled output that can be emitted to in-game text rendering, console or a browser including font swapping, kinetic type styling and rendering transforms
-
Denoting positional arguments for localization
It’s just an index into your lookup table. You decide.
Introduction
Printable Base89 LUT encoding is used to embed indices into UTF-8 encoded strings. The lookup table’s use is left up to the user.
Printable Base89 LUT encoded control codes have the following properties:
-
The purpose of each index is ascribed by the developer, not the encoding designer
-
Embeddable in UTF-8 encoded strings
-
Viable for systems dev: All control codes display correctly in Visual Studio, gdb, and in terminals
-
Viable for web dev: All control codes log correctly in browsers
-
Trivially skippable: Constant 4-byte length, unlike ANSI/VT codes
-
Specification includes error handling behaviours
-
Compatible by design with C preprocessor concatenation
Control Code
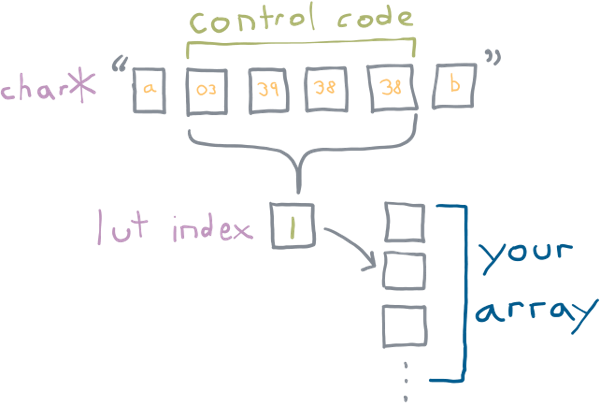
A Printable Base89 LUT control code has the following byte sequence:
ST C1 C2 C303 xx xx xx^ ^ ^| | || LSB MSB|constantxx is a value between [38, 126]. C1 through C3 contain values
that combine to produce an index into a lookup table. C1 is the
LSB, C3 is the MSB.
C1 through C3 all base89 packed integers. They can have a value
between 38 and 126 (inclusive), for a total of 89 possible values.
Why these values? The strings must be printable in any debugger, or dumped to a terminal without being interpreted in a manner that makes review difficult or impossible. The range 38 to 126 are all normal printable single byte UTF-8 characters. In fact, 126 is the last normal, printable character.
But why 38 for a starting value? 37 is the ordinal number of %, which would need to be
escaped if inserted into a C format specifier string. When avoided, we
have a range of 89 possible values per byte.
The three values are combined, with C3 being the MSB.
This forms an index that can be used to lookup into a table which is:
index = (C3 - 38) * 89^2 + (C2 - 38) * 89 + (C1 - 38)The maximum value is calculated as:
max_index = (88 * 89^2) + (88 * 89) + 88 = 704,968The base-10 byte pattern of the maximum value is:
ST C1 C2 C303 126 126 126the base-10 minimum value is:
ST C1 C2 C303 38 38 38The following caveats exist in correct processing of these codes:
-
Index 0 is reserved to indicate an error condition during unpacking. If a code is malformed, index 0 is returned. Make the 0th index in your LUT handle errors.
-
any byte value in
C1-C3outside of the range[38,126]results in an index of 0 — error condition. String processing continues after the sequence. -
If a Printable Base89 LUT code truncates (string does not have three bytes remaining after ST), the index returned is 0 — error condition. String processing terminates, but the part of the string before the truncated Base89 LUT code is still valid.
-
The resulting index can be between 0 and 704968, but oftentimes the lookup will be much smaller. If the index is out of range for a LUT, return index 0 — error condition. Continue string processing.
-
There is no explicit support for escaping ST, eg. having
0x03
    0x03
in a string to produce a single0x03by a string processor. If verbatim0x03is needed in a string for any reason, use a LUT index to emit it. -
If control codes are not legal inside a part of a string (such as inside quotes), the string processor must handle this according to your quote processing needs.
-
Encoding an out-of-range index is a runtime error to be handled appropriately. Do not silently encode 0.
Example Use For Semantic Markup
It is straightforward to define a Printable Base89 LUT code as a string in C and use it in a preprocessor concatenation:
// note: \x27 is 0x27 which is 39 in base 10#define CODE_RESET "\x03\x27\x26\x26"#define CODE_NAME "\x03\x28\x26\x26"#define NAME(x) CODE_NAME x CODE_RESETconst char str[] = "Hello, " NAME("guy");static const char* ANSI_LUT[] = { // index 0 is always error "ERROR", // reset "\x1b[0m", // name - bold "\x1b[1m",};static const char* HTML_LUT[] = { // index 0 is always error "<ERROR>", // reset "</span>", // name "<span class='name'>",};output_ansi_string(str);output_html_string(str); Admonishment: Security
Exotic use leads to security issues.
Having the ability to look up into a table and perform arbitrary processing while scanning strings will inevitably lead to exotic uses and therefore security abuses.
The functions that actually process strings rarely have the ability to determine whether the string has user input in it. The reality is that everything that manipulates up the stack needs to correctly anticipate what an LUT can do to the whole system state. Because a LUT gets added to during development, managing what processing a user can do to the system at the place in the code where the string is assembled becomes intractable. Do not do unmanageably crazy things in your table logic.
FAQ
Why continue string processing after an error was encountered?
Efficient string processing routines intended for output emit pieces of a string to buffered streams as needed. Doing string processing of arbitrary length likely requires an allocation, and an additional buffer, in addition to what the buffered stream is doing.
A reasonably efficient Printable Base89 LUT string processor scans a string until an ST code is reached, emits the string up until that point, processes the code, and then continues to scan. This is preferred to copying the string into a buffer and emitting it all at once.
Is it possible to directly encode index 0?
LUT index 0 is reserved for the error case. You should not use it for
a normal sequence. It is possible to encode index zero using the sequence 0x03 0x26 0x26 0x26 in your string, though there is no
reason to do so.
This is preferred to adding one to the processed code, which just adds complexity.
What happens if untrusted input contains a control code?
All untrusted input needs to scan for the ST 0x03 byte, and have it
validated or removed.
This is nothing new. ANSI escape sequences in untrusted user input can also affect output, and need to be validated or removed.
If I Implement This, Where Should I Link to the Spec?
This article’s slug is the permalink you are looking for.
Links To Implementations
-
C single header file: ftg_base89.h
-
Python module py-base89lut
Page 1 of 13 ▶